In addition to spending a lot of time on the server-side stuff last weekend, I was able to completely finish the save/load functionality. It's actually quite a bit different from what I originally intended - and different in a good way. For one saving/loading runs completely from the client-side, which is a contributing factor in how fast it is.
When you want to save a map in the map editor, you simply click the "Save Map" button under the "Settings" tab. You'll then start to download a JSON file to your downloads folder. The JSON file is self-containing, without external references. There's two reasons why I made it self-containing:
You can load it up offline and it will still work.
If there were external references to images in the map file and those images were moved or deleted, the map file wouldn't work.
The biggest disadvantage of not using external references is file size. If I had used external references, map files would be mere kilobytes. But because I'm storing edited areas of the canvas with the base64 encoding scheme, the files have the potential to be 10-15MB+. File size will vary greatly, in fact, and I'll explain why below. For every 1000 x 1000 square-pixel area of the map you edit with the brush tool, an additional 300KB is added to the file size.
Because of this, I'll likely add an option to save a light-weight version of the map file, with external references to images stored on Amazon's S3.
How it works - you can stop reading now if you have no interest in programming
In my game, there are two aspects of the HTML5 Canvas that need to be saved: game objects and the texture layer. The game objects consist of everything you can interact with in the game: units, buildings, trees, etc. In my game, those game objects are Phaser.Images and Phaser.Sprites. Saving those is easy and I won't go into detail on that here. The basic idea is that you loop through all of your game objects, store their x/y coordinates, image keys and any relevant data into the object that will go into the file the client will download.
The texture layer is the hard part. In Feudal wars, the 'texture layer' is the landscape created by the map editor's brush tool which blends textures on top of an orthogonally-tiled base texture (grass is the default). Although the tiles in the texture layer are images and bitmap data objects themselves, they differ from regular game objects because their pixels are altered by the brush tool. This is why I need to 'take a picture' of them. I can't regenerate them from their base textures because their pixels are altered from their original state.
Normally, with these kinds of games, saving and loading doesn't need to be all that sophisticated. But in my particular game, saving and loading is complicated by two factors:
Browsers aren't designed to save/load content from a user's local machine. They're designed to upload/download content from a web server.
My texture-placement system is completely unorthodox. In typical 2d map editors, textures are placed using a grid-based system. My texture placement system isn't constrained to a grid. The reason why they are typically constrained to a grid is because of one simple fact: if the placement of textures can be recorded with simple x/y coordinates, you don't need to save the textures in the map file. You only need to save the x/y coordinates of the textures that are placed and then you can regenerate the map procedurally from within the game.
Problem #1 was solved easily thanks to the File API which works surprisingly well in all modern browsers. Problem #2 required a bit of thinking. It's one thing to save the visible portion of the canvas as a dataURL and write it to a file - any chump can do that. But to save the entire canvas in a manageable file size, including the invisible parts not being rendered, when it's 15,000 pixels in width/height and in webgl mode**, now that's tricky. If you were to save a 15,000-square-pixel map as a PNG for example, your file size would be in the gigabites. And that isn't even an option because, with memory constraints, browsers aren't capable of processing that much data anyway.
My original plan was to rely on server-side processing. If I could send the canvas data piece meal to the server, I could have the server process it, compress it and send it back as a single file in a manageable format, such as a zip.
So I set about slicing up the data into small bits that could be sent and processed by the server. What I ended up figuring out was that I could slice everything in such a way that I didn't even need server-processing. Instead of taking a picture of the entire canvas and putting it into string format, I took pictures of only the parts of the canvas I couldn't procedurally regenerate. The only parts of the canvas I couldn't procedurally regenerate from the base tiles were the parts affected by the brush tool. So it was only a matter of identifying those affected parts and extracting their base64s. Here's what I did to accomplish that.
1. Create a grid representing the entire game world. The node sizes in the grid are 1000 x 1000 pixels. Inside each node, place a Phaser.Rectangle at the appropriate coordinates. You can use a nested for loop to determine the coordinates:
function createCustomizedTilesGrid() {
    customizedTilesGrid = {
    };

    customizedTilesGridNodeSize = 1000;

    customizedTilesGrid.width = fnRound(game.world.width / customizedTilesGridNodeSize) + 1;
    customizedTilesGrid.height = fnRound(game.world.height / customizedTilesGridNodeSize) + 1;

    for(var i = 0; i < customizedTilesGrid.height; i++) {
        customizedTilesGrid[i] = [];
        for(var q = 0; q < customizedTilesGrid.width; q++) {

            var topX = (q * customizedTilesGridNodeSize);
            var topY = (i * customizedTilesGridNodeSize);
            var rect = new Phaser.Rectangle(topX, topY, customizedTilesGridNodeSize, customizedTilesGridNodeSize);
            customizedTilesGrid[i][q] = {
                'customized' : false,
                'rect' : rect,
                'debugColor' : 'blue'
            };

        }

    }

}
2. Whenever an area of the canvas is altered, mark it in your grid. To determine which areas are marked, I’m checking for intersections with the brush tool and the Phaser.Rectangle in my grid, then setting a property called "customized". I'm debugging by coloring in the grid nodes as red or blue, customized and not customized, respectively.
function markCustomizedNode(brushCircle) {

	var brushBounds = brushCircle.getBounds();

	if(customizedTilesGrid != undefined) {

		for(var i = 0; i < customizedTilesGrid.height; i++) {

			for(var q = 0; q < customizedTilesGrid.width; q++) {

				var rect = customizedTilesGrid[i][q].rect;

				if(Phaser.Rectangle.intersects(brushBounds, rect)) {
					customizedTilesGrid[i][q].customized = true;
					customizedTilesGrid[i][q].debugColor = 'red';

				}

			}

		}

	}

}

function debugMarkedNodes() {

if (customizedTilesGrid != undefined) {

            for (var i = 0; i < customizedTilesGrid.height; i++) {

                for (var q = 0; q < customizedTilesGrid.width; q++) {

                    game.debug.geom(customizedTilesGrid[i][q].rect, customizedTilesGrid[i][q].debugColor, false);
                }

            }

        }

}
3. When a user clicks "save map," extract the base 64s from the marked nodes and their x/y coordinates. To accomplish this, I’m drawing the entire texture layer into a bitmap data object using drawGroup. Then I copy the area of my texture layer (topLayerBMD) which corresponds with a marked node and extract the base64 from its canvas property:
function getCustomizedBase64s() {
    var customizedTiles = {
    };
    var topLayerBMD = game.make.bitmapData(game.world.width, game.world.height);

    topLayerBMD.drawGroup(topLayer); // if the map size is too big, webgl cannot do this on some browsers
    var tileNum = 0;
    for(var i = 0; i < customizedTilesGrid.height; i++) {

        for(var q = 0; q < customizedTilesGrid.width; q++) {

            if(customizedTilesGrid[i][q].customized) {
                var rect = customizedTilesGrid[i][q].rect;
                var bmd = game.make.bitmapData(rect.width, rect.height);

                bmd.copy(topLayerBMD, rect.x, rect.y, rect.width, rect.height, 0, 0);
                var base64 = bmd.canvas.toDataURL('image/jpeg', 0.60);
                base64 = {
                    'base64' : base64,
                    'x' : rect.x,
                    'y' : rect.y
                };

                customizedTiles[tileNum] = base64;
                tileNum++;
            }

        }

    }

    return customizedTiles;
}
You've then got all the image data you need in a nice, neatly packed array (the return value of getCustomizedBase64s).
And that's pretty much it. From here, it's just a matter of saving your base64s and x/y values, saving the data (ideally in a JSON) and reloading with the File API. I won't go over saving/loading data using the File API in this tutorial, but here's an idea of what your code should look like when adding the base64s back to the game world. "mapFileContents" is the object containing data from the loaded file. Note that I'm using jQuery here to loop through the customizedTiles object. I tend to use jQuery a lot as a utility. $.each provides a much less verbose way to loop through objects/arrays than the native javascript for loop.
function addCustomizedTiles() {
    var customizedTiles = mapFileContents.customizedTiles;

    $.each(customizedTiles, function(key, object) {

            var tileX = object.x;
            var tileY = object.y;

            var image = game.add.image(tileX, tileY, 'customizedTile' + key);

            topLayer.addChild(image);

        });
}
** Normally when you attempt .toDataURL on a webgl canvas, your dataURL doesn't have anything except black pixels. To get around this, I set preserveDrawingBuffer on the canvas's webgl context. This has possible performance implications, but it will save the canvas the same way it would in a 2D context. If it is feasible, a better option would be to draw the entire canvas into a second canvas with a 2D context, then extract your strings from there.
My goal is to have a publicly accessible beta version of the map editor up by June 20th. By that time, I’ll have finished the sharing functionally which (i’m hoping) will greatly expedite things in the art department. By “sharing” I don’t mean sticking a Facebook Like and Twitter button in every nook and cranny of the game (what ‘sharing’, unfortunately, has come to mean these days), but sharing of custom artwork and maps. Here’s how it will work.
You register an account at feudalwars.net and load up the map editor. Every time you upload a custom art asset, you will be presented with an option to make the asset public. This will put your artwork in a public repository which other players have access to.
When you have finished creating your map, you can choose to export it which is a way of saving it permanently (outside the browser session). In the export window, you’ll be presented with an option to share your map publicly. If you select that option, the map will go to a public repository on export. I’m putting the option in the export feature to save bandwidth. I need to send all map data and process it on the server-side anyway so it only makes sense that data should make the trip to the server and back only once.
Here’s what I have planned for the public repository:
Sort by asset type: artwork or full map.
Artwork can be sorted by various types (e.g. textures, buildings, trees, bushes, etc) and an author-created tag. Each asset will have an auto-generated thumbnail of the asset, an author (linking to the author’s account), and an option to add the asset to your account. Once the asset is added to your account, you can use it inside the map editor. It will show up in the respective category, marked in some way to indicate it’s a custom asset and will likely have a tiny link to meta info. Clicking the meta info link will bring up various meta data: creation date, author, size, etc.
Maps can be sorted by most recent and most popular (and probably various other sort filters, like size). Each map list item will have an auto-generated thumbnail of the map, an author (linking to the creator’s account), meta info, a download link and a link to open up the map in a separate browser tab.
I realize that all of this sounds like a lot to accomplish in one month but Drupal, my CMS of choice, will do a lot of the SS heavy-lifting, including: session handling, user login + authentication, and, in general, retreiving, sorting and displaying any content stored in the database.
Forseeable problems
1. Custom game assets won’t work with pathfinding. I’ve thought about that and have been working on developing a system for users to manually mark walkable/unwalkable areas of their custom game assets. It’s really not rocket science. In 9 time out of 10 scenarios, the walkable area of the image is simply the area with transparency. Then you consider proportion of the object’s width/height and its 3D projection on the plane. It’s something that can be done by eye. An interface with a grid overtop the game asset would work. Users could mark which nodes on the graph are walkable/unwalkable. As it is now, when you upload a custom asset, the system “guesses” as to what areas of the image are walkable and non-walkable. This guess will be the default if the user forgets to mark the image.
2. Bandwidth. I’m currently trying to figure out a way to cut down on map file sizes. Because my editor performs complex and resource-intensive operations on bitmap objects, there really isn’t an easy way to procedurally regenerate the map by recording user inputs and feeding them back into the engine at high speeds, which is the only way I could possibly get small file sizes of such a data-rich environment. After debating this subject on the html5 game dev forum,I’ve decided to go the server-side route. The basic idea is that I’m cutting out areas of the map which are editing with the brush tool, converting them to string format (base64s), compressing them in some way, sending them (along with other map info) to the server for processing and, finally, receiving a zip file from the server as a response… yeah it’s just as complicated and difficult as it sounds. And it means the map editor isn’t 100% client-side i.e. you need to be online to save maps. I suppose I’ll need to get around this by adding the functionality to save your map to local storage. The data limit for LS is 5MB, so you would only be able to store 2 or 3 maps at a time, unless you manually changed your browser’s limit. I’ll need to explore that later.
Within the next week I plan to upload a video demonstration of the Feudal Wars map editor. And based on feedback from that video, I will release an interactive prototype. It only makes sense to release the map editor before the game. After all, I need to build the map editor first almost out of necessity, since other aspects of the game rely on it.
The main goal for the map editor can be expressed with the following analogy:
Photoshop is to images as my map editor will be to 2d games.
I say 2d games and not 2d RTS games, because, eventually, the map editor is going to be versatile enough to outright build separate games not limited to the RTS genre. Of course that versatility won’t be there at initial release. But much later on, once I’ve finished the custom game creator components, complete with triggering mechanisms, messaging/cinematics, objectives and all the tools people need to create their own custom games.
It’s a bit audacious, I know, but I think it can be accomplished with all the tools available in Canvas and webGl.
One of the big features of the map editor is zero grid restrictions on walkable terrain. In typical 2d map editors, the size of ground tiles is restricted to a grid system. The FW editor does away with that since walkable terrain elements are not represented in the grid and can therefore be any shape/dimension.
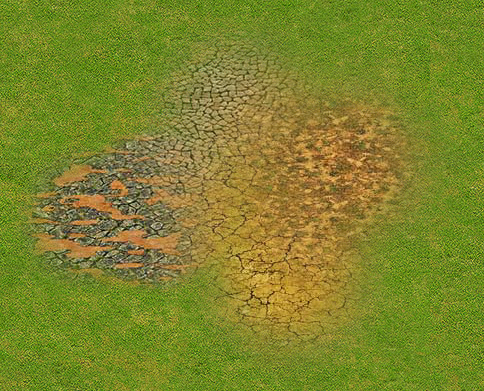
This allows for a lot of freedom in how tiles can overlap and blend with each other:
Note the shape of the texture is that of a circle. Neat huh? I can get away with ground textures not being restricted to the grid because I have independent grids for pathfinding, rather than a single central grid for tiles/game objects.
Unwalkable terrain elements, such as water and cliffs, will be restricted to a grid. i.e when you place a water texture, it has to be proportionate with the node size of the grid and needs to snap to the grid. In essence the water area placements need to be modular, because the pathfinding system is modular.
Another big feature of the map editor is the ability to upload custom game assets (including ground textures, terrain objects and buildings). This is something I had planned to add from the very beginning. I want to give people the tool to create an implement their own artwork into custom maps/games. This is a feature anyone with basic photoshop skills can take advantage of. What sort of of content are people allowed to upload and with what spec?
Here’s a rough idea:
Buildings and terrain objects (such as trees, cliffs, etc) need to be in the dimetric perspective (the 3D camera is 30/45). This is optional but your assets will look really stupid if they are not in the correct perspective. I plan on writing detailed instructions for creating artwork in the correct perspective.
Ground textures can be no less than 1000 pixels wide and 800 in height and no greater than 2500 wide and 1500 in height.
Why so big, you ask? Well, when you load a texture into the map it starts out in a compressed format, such as a JPG or PNG. The second you try to edit that texture in the map editor by, for example, blending another texture on top of it, it converts to an uncompressed format: a bitmap.The HTML5 canvas can easily manipulate bitmap data (cropping, blending, changing hue, etc), but it can’t touch compressed formats. This is why I make the tiles so big. Converting to a BMP is a hefty operation, especially for a browser. A few larger images is much better than having oodles of smaller images because fewer images means fewer conversion operations, which ultimately means smoother performance.
So yeah, that’s a little of what I have planned for the map editor. Stay tuned for the video demonstration!